Managing a Tracheostomy
Steps when supporting clients with tracheostomies.
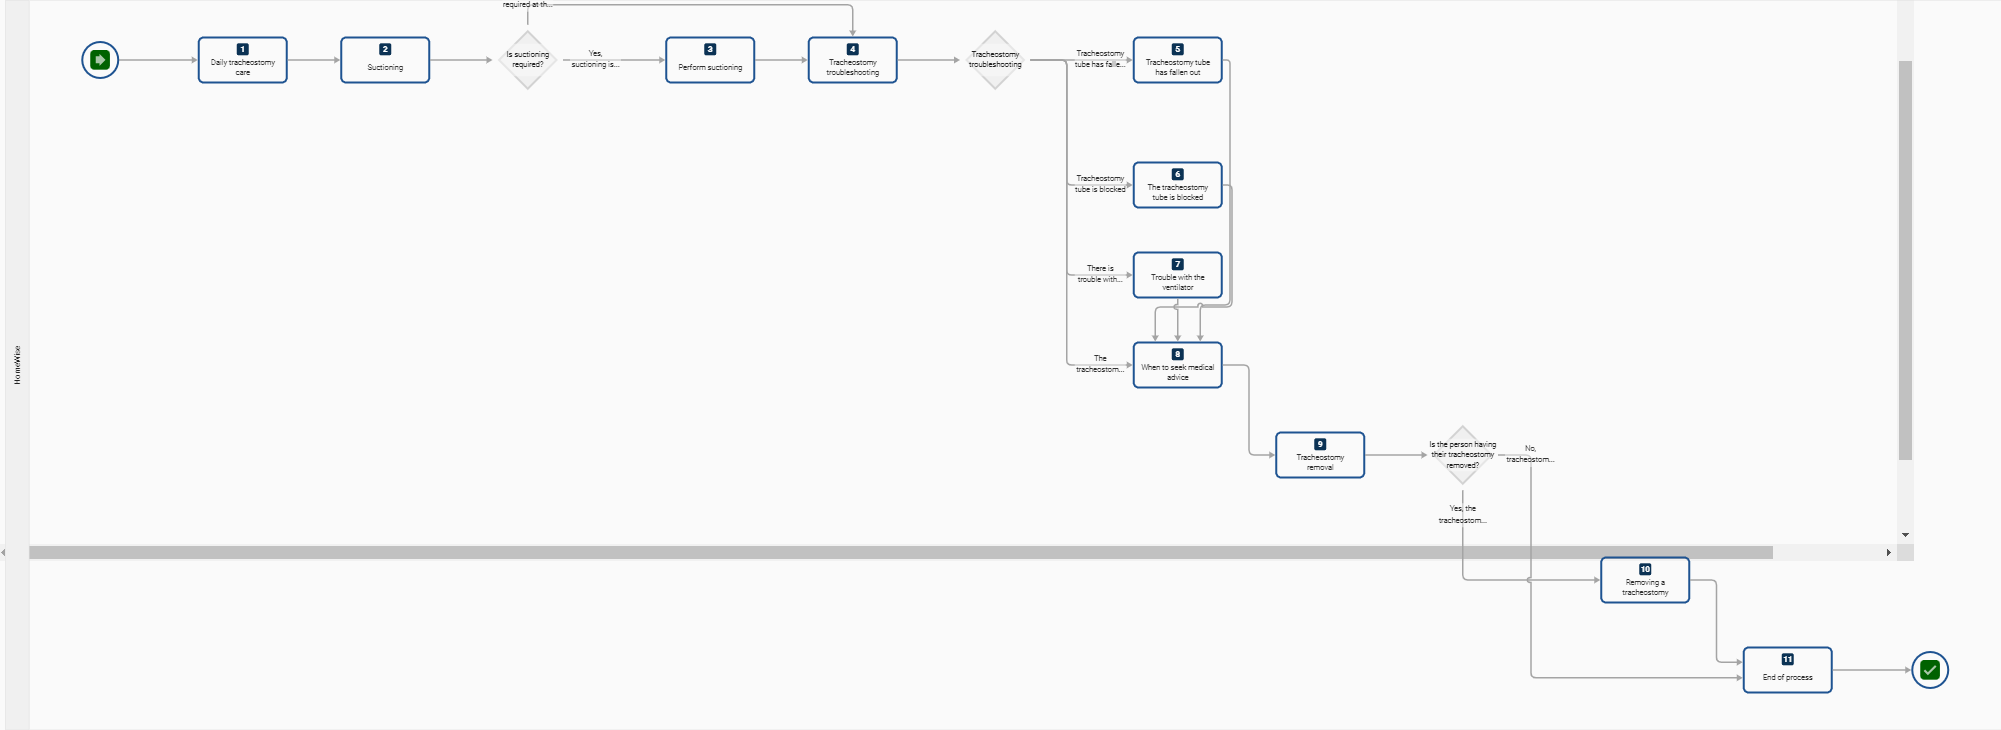
Process Map
Process Map

Related Items
Process - Step by Step
Start
- This process guides supporting participants with tracheostomies (trachs)
- Managing and caring for individuals with a trach is a challenging, responsible skill that requires safe and competent technique. Staff caring for clients with tracheostomies must understand:
- How a trach impacts normal anatomy
- Types of trachs
- The function of different tubes
- How a speaking valve can impact the airway
- daily management
- things that can go wrong
- the de-cuffing and weaning process.
- Only workers who have completed appropriate training can manage tracheostomy care. Inadequate and inappropriate care can lead to death.
- Policies and procedures must be followed.
- Workers must always work within their scope of training and practice. If ever in doubt, seek assistance from HWH Clinical Care Managers or other senior and qualified health practitioners.
Step 1. Daily tracheostomy care
- Guidelines for daily tracheostomy care are to:
- Forge a positive and reassuring relationship with the client —those with a tracheostomy often have a poor self-image
- Workers must always explain to the client and family the purpose and type of procedure they need to perform
- Obtain client consent before any procedure
- Be mindful that a client is not able to speak while an inflated cuff is used
- wash hands, wear gloves, apron and goggles
- Check that the tracheostomy tube is secure and clean and securely in place with cotton tape or Velcro strap (change if soiled)
- Check and change the inner cannula for any build-up of secretions
- Keeping the inner cannula clean is vital as secretions can reduce the diameter of the airway and obstruct the airway
- Check that the stoma dressing is clean
- Check that the skin around the stoma is clean and dry with no bleeding or crusting
- If the stoma site is not clean, wash with normal saline and alcohol, wipe and moisturise with barrier ointment—protect skin with a gauze dressing if needed
- Follow cuff management policy—minimal leak technique for mechanically ventilated clients, and pressure should not exceed 2.6 kPa for cuff inflation
- Where a cuffed tracheostomy is used, ensure that a cuff manometer and a 10ml syringe are at hand
- Usually, a tracheostomy tube inserted will be a cuffed tube that provides a sealed airway—either a temporary measure until the client can control their secretions but long-term if they are unable to do this
- routine observations such as looking for:
- Obstruction of the tracheostomy tube
- Signs of blood or hematoma in the neck or trachea
- Abnormal tissue formation in the trachea
- Any narrowing of the trachea
- Ensure tapes are not too tight or too loose
- Assess the risk of aspiration before removing the inner cannula—deflate the cuff
- Routine suctioning—an essential part of daily care
- Regular protective humidification—reduce airway plugging by using a nebuliser or oxygen delivery system
- Document all observations, interventions or abnormalities.
Step 2. Suctioning
- Signs that suctioning may be necessary:
- Audible or visual signs of secretions in the tube
- Signs of respiratory distress
- Suspicion of a blocked or partially blocked tube
- Inability by the person to clear the tube by coughing out the secretions
- Vomiting
- Desaturation on pulse oximetry (if using one)
- Changes in ventilation pressures (if ventilation is being used)
- Request by the person for suctioning.
Decision A: Is suctioning required
- Yes - Step 3 - Perform Suctioning
- No - Step 4 - Tracheostomy troubleshooting
Step 3. Perform Suctioning
- When performing suction:
- Assist the client into an upright position with the head hyperextended (unless physically unable)
- Suction every 4 hours or as needed
- Consider pre-oxygenation if the individual is receiving additional oxygen or is ventilated
- wash hands, wear gloves, apron and goggles
- Remove the tracheostomy device before open suctioning to allow easy access
- connect tracheostomy tubing to the suction machine, turn it on and set it to the appropriate negative pressure
- suctioning systems can be open or closed—open suctioning involves single-use catheters inserted via the open end of the tracheostomy tube
- Use a shallow suctioning technique for the tracheostomy tube, as suctioning can be uncomfortable
- Closed suction systems allow the same catheter to be used many times
- a Yankeur suction catheter is used to either clear the mouth, pharynx or trachea (do not let the tip of Yankeur touch a non-sterile surface)
- suction a small amount of water or normal saline from the basin (about 100mls) first to lubricate the catheter and tubing
- suction should not exceed 10 seconds
- Do not exceed three episodes of suctioning in succession
- Occlude the suction port with the gloved thumb on the removal of the suction tube
- Check that the client is not in pain or that the airway has not been compromised during the process
- If this procedure causes respiratory distress, the catheter is withdrawn, and additional oxygen is supplied by a stoma delivery mask.
- Care is required when suctioning as tracheal damage can be caused
- Only suction within the tracheostomy tube
- Only suction at the recorded suction depth
- Use pre-measured suction catheters (where available) to ensure accurate suction depth.
- Use the correct suctioning pressure
- Complete suctioning within 5-10 seconds.
Step 4. Tracheostomy troubleshooting
- All workers supporting clients with a tracheostomy must be alert for the following:
- The tracheostomy tube that has fallen out
- The tracheostomy tube is blocked
- any signs of ventilator trouble.
Decision B: State of Tracheostomy
- Fallen out
- Blocked
- Ventilator issues
- The tube and ventilator are working normally
Step 5. The tracheostomy has fallen out
- Keep the person calm as they’re still able to breathe, but immediately:
- Try to put the whole tube back into the hole/stoma
- If this is difficult, try to put the next size down tube in the hole
- If you can’t do this, call Triple Zero (000) and use the tracheal dilators to hold the hole open.
Step 6. Tracheostomy is Blocked
- Remove the inner tube and replace it with a clean one.
- If the person is still in difficulty, suction the tracheostomy tube, then either:
- If this relieves the person’s symptoms, have a nebuliser immediately and arrange to take the person to the hospital for a check-up or
- If the person is still in difficulty, call Triple Zero (000) immediately.
Step 7. Ventilator Trouble
- As a guide:
- Low-pressure alarm—check the ventilator tubing, trach cuff (if there is one) or water in the tubing
- High-pressure alarm: Check if suctioning is required, there is water in the tubing, the tubing is kinked or pinched, the trach tube is blocked, or the person is coughing.
-
Low power alarm—check power is plugged in, check battery or change battery
- In the event of an electricity outage and the battery does not work:
- Remove the ventilator tubing from the trach tube
- Give breaths with a breathing bag until the power comes on or help arrives
- Call Triple Zero (000) if the power does not return immediately.
- In the event of an electricity outage and the battery does not work:
Step 8. When to seek medical advice
- Seek medical advice immediately when:
- There are signs of respiratory distress (cyanosis, tachypnoea, hypoxia, stridor, gurgling breath sounds, oxygen desaturation)
- tracheostomy tube becomes dislodged
- obstruction
- cuff leak
- faulty oxygen (O2) delivery or ventilation device
- ineffective humidification
- bleeding and damage to the throat
- blockage of the tube with secretions, which can be breathed into the lungs, causing aspiration pneumonia
- infection
- scar formation
- dehydration
- cardiac or respiratory arrest (stop breathing).
- People with a tracheostomy are at a greater risk of pneumonia (chest infection).
- Signs and symptoms of pneumonia include:
- fever
- more mucus than usual
- trouble breathing
- increased coughing
- mucus that is yellow or green, sometimes with an odour.
- Contact a medical practitioner if there are any signs of pneumonia.
Step 9. Tracheostomy removal
- Guidelines for daily tracheostomy care are to:
- Forge a positive and reassuring relationship with the client - those with a tracheostomy often have a poor self-image
- Workers must always explain to clients and families the purpose and type of procedure they need to perform
- obtain client consent before any procedure
- Be mindful that a client is not able to speak while an inflated cuff is used
- wash hands, wear gloves, apron and goggles
- Check that the tracheostomy tube is secure and clean and securely in place with cotton tape or Velcro strap (change if soiled)
- Check and change the inner cannula for any build-up of secretions
- Keeping the inner cannula clean is vital as secretions can reduce the diameter of the airway and obstruct the airway
- Check that the stoma dressing is clean
- Check that the skin around the stoma is clean and dry with no bleeding or crusting
- if the stoma site is not clean, wash with normal saline and alcohol, wipe and moisturise with barrier ointment - Protect skin with a gauze dressing if needed
- follow the cuff management policy - minimal leak technique for mechanically ventilated participants, and pressure should not exceed 2.6 kPa for cuff inflation
- Where a cuffed tracheostomy is used, ensure that a cuff manometer and a 10ml syringe is at hand
- Usually, a tracheostomy tube inserted will be a cuffed tube that provides a sealed airway - either a temporary measure until the client can control their secretions but long-term term if they are unable to do this
- routine observations such as looking for:
- Obstruction of the tracheostomy tube
- Signs of blood or hematoma in the neck or trachea
- Abnormal tissue formation in the trachea
- Any narrowing of the trachea
- Ensure tapes are not too tight or too loose
- Assess the risk of aspiration before removing the inner cannula—deflate the cuff
- Routine suctioning - an essential part of daily care
- Regular protective humidification - reduce airway plugging by using a nebuliser or oxygen delivery system
- Document all observations, interventions or abnormalities.
Decision C: Is the person having the tracheostomy removed?
- Yes - Step 10 - Removing a Tracheostomy
- No - Step 11 - End of Process
Step 10. Removing a Tracheostomy
- When removing a tracheostomy:
- The decision to permanently remove or change a tracheostomy tube should be made only by the order of a qualified health professional
- The client needs an explanation of how this process will feel
- Weaning is guided by client progress, respiratory effort and rate—two methods include:
- capping and gradual tube downsizing or
- 24-48 hours of cuff deflation with 5-minute assessments of airway patency via finger occlusion
- Dispose of all tubing and equipment per the waste disposal policy to prevent cross-contamination.
- Communicate with clients how they feel to ascertain readiness for decannulation of tracheostomy (removal of the tracheostomy).
Step 11. End of Process
- The process ends if the client with a tracheostomy:
- no longer requires a tracheostomy - it is removed
- exits our services, or
- passes away.
End